Sunday, May 31, 2015

Chemical Warfare

Yesterday we managed to put together the entire machine room but the PVC glue must allowed to harden for at least 12 hours before it gets into contact with water. 
So we couldn't test run anything yesterday. No clue whether the pump works or there will be fountains squirting out of each pipe connection.

To be quite honest this had me so worried that I woke up before four this morning and couldn't get to sleep again. So it became a rather early morning today.

When I popped out this morning the pool had taken on a green/brownish color, mostly looking like a duck/frog pond.

Frog pond

It was really about time to get the pump/filter up and running. There was a coating of sand and muck all over the pool bottom. Most of it since the time when we refilled. The fine grained stone flour/sand flies around in the wind. We have started to lay ground cloth to stop the sand from flying around. It's also there to stop anything from growing once we get cranking with building the wooden deck.

To help the pump a bit I loosened the cap where you inspect/clean the filter and backfilled the pump directly with a garden hose. This way I got rid of all the air trapped in the pipe from the outlet of the pool to the inlet of the pump. When starting the pump it just picked up the water and immediately started to build a bit of pressure. The pump must never suck plain air as it could take damage from that.
Oh well what a relief, things are actually working. Following the manual and backwashing the filter first. That is the procedure to run the water backwards (from down to up) in the filter to get rid of dirt caught in the sand and push that out into the waste pipe.

Then attaching the "vacuum cleaner" and sucking up all the muck in the pool. Note that if the pool is as contaminated as ours it's better to set the filter to "waste" causing the water to go directly to the waste pipe without clogging the filter. Sure a good deal of water gets wasted but considering the amount of sand in the pool there was really no option.

Some time later one could actually see the pool bottom again...hooray.
Some vacuuming later

Our local Miamipool sales representative popped by with some goodies. As a side note: This is the major reason for our choice of vendor...they have guys close by to you and they make house calls on Sundays. Anyways it was time to strike back...with vengeance. Once the pool is clean of major debris it's time for chemical warfare. All kinds of stuff such as flocking agent, Baquacil (instead of chlorine) but my favorite has to be the "Chock". It's apparently used when taking the pool into usage after winter or in our case for the first time.

Loads of chemicals were dumped into the pool making it very hazy. Guess it's the flocking agent doing it's work. We won't see the final result until tomorrow when it has done its job and major particles should have dropped to the pool bottom. 

Whilst Agneta spent some quality time with a brush trying to get rid of the algae that sticks to the walls when there's no cleaning agents.

I was busy trying to resurrect the previously demolished wooden deck.
Things didn't go quite as we planned from the beginning. The original idea was that the pool would cut into the deck but due to solid bedrock we had to move the pool so now the deck is an itsy bit too short. Don't think that'll be a problem. Though what bugged me most was that the pool got a bit lower than we had calculated so I had to spend the better part of the day lowering the framing to the old deck.  Which in an essence means cutting grooves into the framing in order to lower it on the concrete posts/supports.

As a final to the week we've also started to replant the grass hoping that in a near future the dinosaur tracks are covered and all forgotten.


Next week will be a vacation week as I'm off to Sweden Rock.

Title reference: Chemical Warfare/Show no mercy/Slayer

Pump

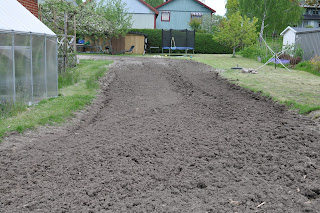
During the week the guys (Stora Vörta) that did the excavation did a great job leveling the worst of the destroyed lawn. Using some attachment to a tractor that has ground the soil into small pebbles.

Before

After
Throwing a few kilos of grass seeds on top of that hoping for the best.

The first name for this post that sprung up in my mind was Pump, with reference to the classic Aerosmith album bearing the same name.

The main goal this weekend was to was to assemble the machine room. That is the circulation pump, sand filter and the bypass. The water in the pool has started to take on a slightly...greenish tone due to algae so it's definitely time to the circulation/filtering up and running.

 One advice I'd give to anyone planning to build a pool is to make sure you have your machine room prepared before building the pool. That way you can get the system up and running as soon as you've assembled the pool. That will save you a lot of chemicals and cleaning the pool from algae which otherwise will pretty quickly start to grow in stagnant water.

In my case I was both lacking the spare parts as well as the ideas how to assemble the machine room in the most efficient manner. As much as I like building/wiring things I really....really hate water pipes. There's always something leaking somewhere, which is inevitable and I really hate that.

For the lacking spare parts we got hold of a great guy that had all we needed. If you're planning to build a pool and happen to live in the vicinity of Karlskrona the I can highly recommend a company called Saltö Aqua Konsult. Tommy seems to have most things you'll ever need with respect to pipes/hoses/bends and other thingies related to the water flow parts of a pool. And what makes it even more great is that he's pretty much open for business every day including weekends and evenings. I got hold of reinforced PVC hoses and a few bends and connections...all that I needed.

As for my lacking motivation for water related construction it was solved by enlisting a trusted friend.
Mr. Slayer

After having spent some thinking on where to put the bypass we set forth to cut/glue/assemble the pipes and hoses.
Finally arriving at this.


Spend some time admiring the beautiful bypass construction...:)
A bypass allows you to bypass (surprise) the heating system using a set of valves. If the horizontal valve is open and the vertical ones are closed then the water is short circuited/bypassed from the heating system and vice versa.  
The hoses disappearing under the house/sauna will go to the air heat pump...which is yet to be connected. It's not needed at this stage.

As can be seen from the pictures we used a combination of stiff PVC pipes and "soft" PVC hoses. In a crammed area as this running it all with pipes would have lead to a massive overuse of bends. So a hose is a much more flexible solution. 
Again if you're planning for a pool, spend some time contemplating on your machine room and what parts you'll be needing.

On the other end of the machine room the inlet/outlet previously assembled was connected to the pump/filter. The order of connection is inlet -> pump -> filter -> heating system (optional) -> outlet.
The pipe running on the wall is the waste pipe. This is where all the wastewater is sent when backwashing the filter. And by no surprise the waste pipe is connected to the ingenious stack of connections built previously connecting it with the wastewater from the rain gutters going down the drainage.


Out of the 5m of PVC pipe delivered with the pool, this was left when we finished. Not a single millimeter of pipe has been wasted. And I'll anyways probably need two short stumps of pipe when connecting the air heat pump.


All of this on the Saturday, let's see what we can get done on Sunday.

Title reference: Pump/Aerosmith

Sunday, May 24, 2015

Scars

The yellow dinosaurs have retreated, leaving deep scars in what once was our garden.
Following the path of destruction the garden in its places mostly resembles a plowed field.
Dinosaur footprints
The company doing the excavation claims to have some heavy equipment with which they can churn up the soil breaking up all lumps of mud. But it but that will have to wait until later when the soil dries up.
Potato field or garden?
The pool itself is pretty much finished. Some cleaning up to be done to get rid of the sand.
Without the deck in place it looks like a mini beach resort. Believe the kids would have been completely satisfied with having sand next to the water. Our daughter (4 yrs) already planned to take a dip. It really didn't help that we tried to explain that the water is freezing cold.

Beach resort
Next up is the pump/machine room. The plan was to stuff the circulation pump and sand filter in between the sauna and the garage. Not a lot of space but should be sufficient for the purpose. The location is sheltered from weather as well as allowing us to build doors on both ends providing noise reduction. Even though the pump is most likely rather silent it will produce noise which I intend to reduce as much as possible.

First thing is to build a simple floor on to which we can attach the pump. It needs to be attached to something as otherwise the rotational movement of the pump will cause it to move around. The filter on the other hand will be filled with 70+ Kg of sand and will not budge.

snakepit
Having built the floor of the machine-room-to-be we sat and pondered for a while how to most efficiently connect the pipes. Stiff 50mm PVC pipes and bends are not that fun to work with.
Some Googling later we found out that there are reinforced PVC tubes allowing for some flexibility.
So we gave up on the machine room and will order new parts. It's just not worth the aggravation to use stiff pipes.

Spending the rest of the weekend to ponder on the layout of upcoming deck and preparing the ground to be reasonably level.

Title reference: Scars/Catacombs of the black Vatican/Black Label Society

Tuesday, May 19, 2015

Snakecharmer

Ever tried to lay 50mm PEM pipes on your own?
It's like wrestling an adult anaconda, virtually impossible.
Be sensible and don't attempt the feat on your own. I had to hoist heavy 30Kg concrete slabs on the pipe to keep it in place whilst trying to straighten it out.

Took vacation on the Monday (making five straight build days) since the excavator was planned to come and fill back the soil that day.

My plan was to rather quickly lay out the pipes and get them connected.
Thinking it couldn't take that long time. I was sort of planning to just take it easy for the rest of the day waiting for the water to slowly fill up.

This was just about the same mistake I made when I went for my first parental leave. Thinking I would spend the entire days watching movies and taking care of my kid. Well as everybody know that ever been on parental leave...there's no slack time.
Same for my Monday...it virtually took hours to wrangle the pipes to position and connect them.
Result of snakewrestling

Right side inlet
The outlet or surface skimmer needed a check valve in order for the water not to flow backwards back into the pool when the pump is not running. You don't need one of these if you manage to install the pump lower than the water surface. This I presume is a rather uncommon setup so most will need a check valve.

Skimmer/outlet

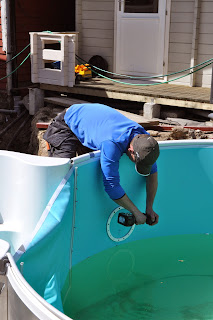
Once the water is reaching the inlets/lamp/outlet one must mount the gasket and screw the inner frame.


Once that is done it's a matter of taking a knife and cut away the liner, opening up in this case the pot where the lamp is to be fitted.
The lamp itself is one big water tight unit with a very long power cable. There's enough of cable to be able to lift it out of the water.
So changing the lamp is a matter to removing this entire package and lift it to the side of the pool. 
The pot where the lamp resides is filled with water, it's actually needed to cool the 300W lamp.


Later that evening I had stairs, lamp and both inlets cut free from the liner.

It's getting late and we'll have to take the skimmer/outlet later in the week.
I'm really tired and actually looking forward to get back to work (my paid work that is) for some R&R.

The excavator still needs to do the filling of last holes but they'll do that without our presence.

Title reference: Snakecharmer/Evil Empire/Rage Against The Machine

Sunday, May 17, 2015

Hell or high water

The last day (Sunday) of the four day weekend dawns. The pool frame is set but still there's a ton of things to be done before we can start to fill the pool with water.
Come hell or high water, few things will stop this family from finishing what we set our minds to perform.
Even the kids have helped out as much as they can. Taking care of each other during these days not "bothering" us, allowing us to work as many hours as possible.

Early bird as I am I went out while the rest of the pack was still having their beauty sleep. The first task was to cover all joints and bolt heads with a special cover tape. This is to prevent these to shine through the liner.


Apparently I made for good entertainment when the rest of the people had breakfast and watched me work.
The ladies then set off to fine tune the floor of the pool, leveling it out as much as possible.

Rear view
At the same time we guys were busy making the frame of the pool air tight.
This is because when fitting the liner one will be using a vacuum cleaner to suck out the air between the metal sheets and the liner thus forcing the liner into place,
Duct tape is useful for almost anything
Once the pool floor was immaculate then it was time to bring out the felt/carpet that is to be laid out in order to make the floor of the pool seem softer and also hiding any imperfections.
The carpet comes in a huge roll of the same width as the pool is in its widest spot.


 So the carpet needs to be cut into shape to fit the pool.
Again the ladies are doing an excellent job and we guys are...well being supportive..:)
Bottoms up
Now we've passed the point of no return and the pool just has to be finished.
We just can't leave it at this stage. We have no clue how difficult/easy it would be to lay the liner.
It's heavy, that I can tell you. It comes packed in such way that you start from one side and then gradually spread it out to a specified point on the opposite side.

This was one of the moments that we've dreaded but much to our surprise the liner was rather simple to lay.

The liner "snaps" into the plastic rail on top of the pool thus hanging there.
Then using an ordinary vacuum cleaner, stuck between the metal sheet and the liner it "sucks" the liner towards the metal sheets. This allows you to shape and drag the liner into place.
Mermaids on dry land
Once satisfied with the placement of the liner it was time to let in the water.
Somewhat surreal feeling to start filling the pool. So many hours have been poured into this and yet this is the first time one actually starts to grasp that it's pool we're building.

Once the water was some 15-20cm up we stopped the vacuum cleaner. By now the weight of the water will drag down the liner, keeping it straight and tight,

Continuing to fill the water to some 40 cm, which is has high we can take it before starting to fill back the soil.
Leaving us with a spanking brand new view from the dining table on the terrace and a very satisfied son. He's one of the loudest yea sayers of this project.

Happy customer
This weekend has been a roller coaster for our mood. Starting with missing sheets, remedied by Miamipool and one of their unsung heroes to us cranking up the gear yet another notch and then finally actually being able to wrap it up.
Sure there's tons of things to be done, like setting up the pump, filter and heater...but that's to come.
Even though it has been tough work, I don't think we've had this much fun together building something. There was often laughter in the air and things just kept progressing.

Now a well deserved glass of wine and then most likely crash in the couch in front of the tele....


Title reference: Hell or high water/Crazy Nights/KISS

New Beginnings

The third day (Saturday) of the build was about to commence.
Starting by assembling the sheets that were delivered last night (see last post).
Now turning the attention to the stairs, even though it's not that heavy it's bulky and somewhat difficult to navigate into place with only two persons.

Shaping up

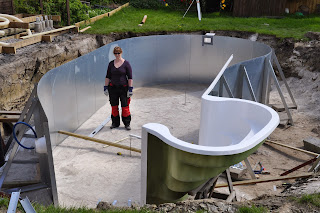
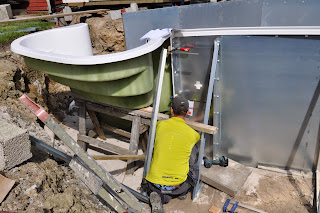
Finally we got the stairs into place, connected with one side of the pool. Now is the dreaded moment to drill holes into the stairs to be able to fit the bolts. This is where one hopes that one has managed to do proper measurements.

Mounting stairs

Later that day reinforcements arrived, much needed.
When attempting to bend the final sheet to meet the left side of the stairs we met heavy resistance.
The curve which with the last sheet needs to bend into to be able to connect with the stairs is just to much to be able to bend. We really could have used a Bender.
Where's Bender when u need him?
It was just mission impossible to bend it into place. We had to undo some of the sheets on the left side to get a larger curve to work with thus spreading the curve to be bent over multiple sheets.
Redoing already done work is not something that spreads a smile on my lips.

Though it was the right decision to do and soon enough we had the full circle completed.
That did spread a smile on my lips. There were some loud cheers from the working crowd when the last bolt was fitted.


Starting to look like a pool

No rest for the wicked. Next on the agenda was to cast concrete on all the supports/struts to really make sure they would not shift. The concrete mixer rented for the occasion proved to be next to worthless. Not much more than a oversized kitchen aid. Unfortunately it was the only thing the rental company could provide us with so we had to do with what we had.


 While me and Tobbe wrestled with the cement sacks the ladies (Agneta and Pea) fitted the plastic rail into where the liner is to be attached. Even that proved to be rather tedious work as the rails are some 3m long and the curve of the pool makes it rather difficult to bend them into place and fit.
Using some profound language (mostly on my behalf) and brute force we managed to get them into place.

Casting concrete on all struts is supposed to make sure they don't shift place.


Stairs are supported by a X strut construction but for the moment we'll leave the extra support.
Will probably cut a piece of timber and use as a support and leave it in the ground when we refill.


Getting late so we sent the ladies into kitchen. It was either that or apply sealer to all bolt heads....they choose the kitchen.
Final touch up for the day was to cover all bolt heads with sealer and fit the water inlets.


We were all covered in fine dust from the stone flour that covers the pool floor. And some of us had gone a few rounds with cement sacks.
Barbeque coming up and then hop into the sauna to sweat out all the dirt and hoist of few beers to clear the throat.


Title reference: New Beginnings/Nostradamus/Judas Priest

Saturday, May 16, 2015

Unsung heroes


Before going further I'd like to pay tribute to the one person that with a huge personal sacrifice kept the hopes up for this project. As noted in the last post we had received a shipment with two sheets of the wrong size, wrecking our entire project plan for this weekends build.

Having had phone conversations with the manufacturer, the very same day (a Friday afternoon) this hero from Miamipool loaded the missing sheets from the factory (in Timrå)  into his car and drove them to us....all 870Km (one direction)!!!.
Somewhere around 11 at night he arrived at our home with the missing stuff.
A coffee and a quick chat later he hopped into his car and set direction back north disappearing just like Santa does on Christmas.

The hero of the day

I bow in awe to the sacrifice he made to help us out.


Title reference: Unsung heroes/Unsung heroes/Ensiferum

Friday, May 15, 2015

Dawn of Creation

Thursday morning, the D-day had arrived, time to start the assembly of the pool frame.
We had four days of constant work ahead of us.

First thing first, lay out the outlines for the pool. All steel sheets are completely square and flat and need to be shaped into the form of the pool. Hence laying out the form is imperative to be able to maintain proper shape


 Ancient techniques such as a string and a stick to make circles still work in 2015.

First sheets coming up. As time goes we find the optimal technique to align the sheets and keep a line of height.


Things are progressing rapidly. Thought it's pretty tedious work to shape the sheets to follow the outlines of the pool.
Using a system of wooden struts jammed between the wall of the pit and the sheets helps to force them into place.


In goes the stairs. Bulky as it may seem it's not really that heavy as it's made of glass fiber, two persons are able to carry it.


Now the devil shows his ugly face as we discover we have received the wrong sheets.
The two sheets with the water inlet holes were supposed to be 750mm and 500mm wide but the ones we got were 1000mm. There was just simply no possibility whatsoever to fit these.

DISASTER. There went our entire planning out of the window.
It's Thursday afternoon and it's a Swedish holiday so no possibility to get hold of the manufacturer.

It all has to wait to Friday morning....


First thing Friday morning is to get hold of someone at the company (Miamipool) to get this mess sorted out. They immediately acknowledge the fact that we got the wrong material.
So what to do? They suggest we can have it Monday...but that would completely throw a monkeywrench into our program. We (Agneta) pretty vividly explained why we need the sheets...NOW.

We've been planning this build for weeks and this was the extended weekend with four days to build.
We got people coming in to help, I got a digger waiting to come in next week to fill up the hole. Already have planned vacation to be here when we fill up the pool...and it continues.
The entire project was in jeopardy if we could not get these metal sheets.

Apparently it was very difficult to find a transport company that could with such short notice to this over day delivery.
After a few hours of phoning back and forth the solution was that some poor soul (more correctly unsung hero) would load the stuff into a car and drive them to us. That may not seem as much of  a feat but considering the factory is in Timrå in Northern Sweden and the distance is over 870Km (one direction) it puts things into perspective.

People will always make mistakes, it's how you remedy these that I'll measure you by.
So sometime later Friday night we expect to see a delivery of the missing goods.
I could no longer bear to feel anger with the company and their mistake. If someone is prepared to drive over 870Km in one direction a Friday just to deliver stuff to a customer then if that's not dedication to customer satisfaction I don't know what.

The rest of Friday we spent make sure the walls were perfectly in line and mounting things such as the water outlet.


Late evening when darkness entered we took out the laser to really make sure we had everything at proper height.


It's late and tomorrow is a new day that brings new hope.


Title reference: Dawn of Creation/Nostradamus/Judas Priest